While these steps might not exactly be the best fit for newer Microsoft Office versions, they work amazingly well for Microsoft Office 2010 or any previous versions of the same.
You will be able to view or open protected Excel Files by modifying the file extension by following these super simple and straightforward 10 steps:
- Create Backup – One of the most important things you have to do even before the procedure begins is to create a backup of the Excel file that is protected with a password.
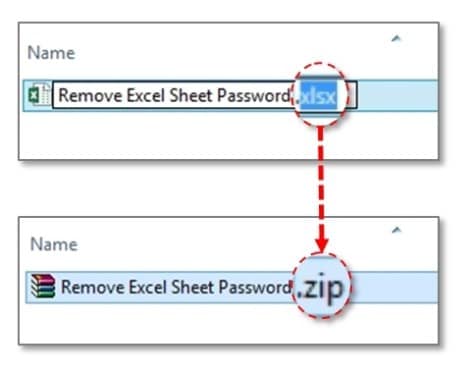
- Rename File – After having created a backup, you need to rename the file by right-clicking on the excel sheet and clicking on the ‘rename’ button.
- Change Extension – Whether your file has a .csv extension or a .xls extension, it is time for you to change it to .zip extension.

- Unzip Content – After having renamed the file and having changed the extension to .zip, it is time to unzip the content from the zip file.
- Search File – Now you need to search for the file that ends with a .xml format.
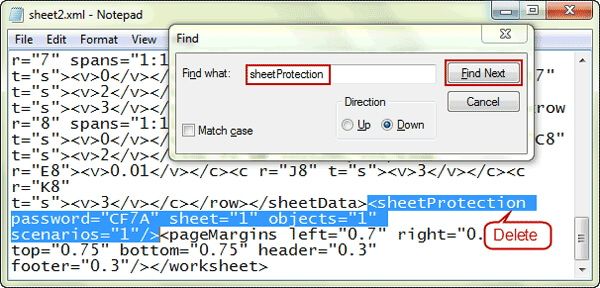
- Open File – After having found the file with .xml format, click on that file and open it with an XML editor.

- Press ‘Ctrl + F’ – Pressing the Ctrl button and F together will let you find for your desired word. In this case, you are searching for the word ‘SheetProtection’. You need to search for

- Remove that Word – Once you have found that word, remove it from the file.
- Save File – After removing the word from the file, save it.
- Change Extension – Once you have saved the file, change back the file extension from .zip to .xls or .csv, whichever you prefer or want.
When you have successfully undertaken all the 10 steps written above, all your worksheets will be rendered unprotected. This means you will be able to open any of your files without having to type in the password.
Comments
Post a Comment
If you any doubt , Please let me know